What is the Average insurance payout for hail damage On Roof?
Are you uncertain how roof insurance handles hail damage in 2025? This post explains key points such as average hail damage claim payouts by state and insights into roof hail damage. It helps homeowners understand roof insurance details and adjust repair plans with confidence and also provides direct answers to common roofing concerns while guiding readers through important aspects of insurance claims. Average Insurance Payout for Hail Damage On Roof Per State State Avg. Hail Claim Payout (2024) Projected Avg. Payout (2025) Texas ~$14,000 consumershield.cominsurtechinsights.com ~$15,000 (↑ ~7%) Colorado ~$13,500 consumershield.cominsurtechinsights.com ~$14,500 (↑ ~7%) Nebraska ~$12,000 consumershield.com ~$13,000 (↑ ~8%) Minnesota ~$12,500 consumershield.com ~$13,500 (↑ ~8%) Illinois ~$12,000 consumershield.com ~$13,000 (↑ ~8%) Key Takeaways Average Hail Damage Claim Payouts by State Average payout amounts differ across states due to regional guidelines and varying damage factors. Insurers may consider harm to a metal roof or minor dents on a vehicle when determining the value of a claim. The law ensures a fair review of all damage, which sometimes includes impacts that cause accelerated wear on property features. In some states, claim estimates rise when systems like air conditioning are affected by hail damage. Evaluators check for signs of wear that could reduce a roof’s life expectancy, especially on properties with a metal roof. The law plays a crucial role in setting standards for these assessments. Data shows that local conditions influence wave damage claim payouts across the region. Damage to a vehicle, air conditioning units, or a metal roof may lead to higher compensation if the damage is extensive and meets legal review. Property owners who witness accelerated wear on their roofs can expect the law to provide guidance throughout the claim process. Understanding Roof Hail Damage Identifying hail damage on roofs is key to ensuring proper homeowners insurance cover. This section provides information on spotting damage, understanding its effects on different roofing materials, and determining when to opt for repair versus replacement. It offers practical insights on bad faith issues, negotiation tactics, and when consulting a reputable roofing contractor can be beneficial. Identifying Hail Damage on Roofs Skilled inspectors assess hail damage on roofs by checking for cracks in the flashing and damage to nearby features like the garage door, ensuring that roof damage insurance policies and homeowners insurance covers address every visible and hidden issue while also considering any tax implications: Damage Element Inspection Focus Insurance Impact Flashing Examine for cracks and bends Affects homeowners insurance covers Garage Door Look for dents and misalignment Influences roof damage insurance payouts Roofing Material Check for chipping and wear May alter tax considerations Effects of Hail Damage on Various Roofing Materials Analysis shows that hail damage on various roofing materials leads to cracked shingles, dented metal panels, and weakened sealants that can influence home insurance claim reviews and average insurance payout for hail damage roof assessments, similar to conditions observed after a tornado; experts note that careful inspection of these elements is key to a successful damage claim process: When to Consider Repair vs. Replacement When assessing hail damages, Northern Generations Construction emphasizes that homeowners insurance policies and an insurance claim’s careful review guide the choice between a repair and a full roof replacement, ensuring the insurance pay reflects true repair needs. This decision is based on damage severity and cost estimates, helping property owners determine the best course of action for hail repairs and avoiding unnecessary expenses: Damage Severity Recommended Action Example Consideration Minor damages Repair Small hail dents or cracks Moderate to extensive damages Replacement Widespread hail impact or compromised roof structure Navigating Roof Insurance for Hail Damage Roofing risk under severe weather in Nebraska and Illinois often leads to hail claims. The section covers if insurance covers hail damage, steps to file a claim, and tips for a smooth process. It provides practical insights to help property owners manage their roof insurance effectively. Does Insurance Cover Hail Damage? For local property owners, reliable service means knowing that insurance covers hail damage when a public insurance adjuster carefully verifies the extent of issues during a hail damage claims review. This detailed inspection supports homeowners using hail damage insurance to secure clear, fair assessments that help guide both immediate repairs and long-term property upkeep. Steps to File a Hail Damage Claim When filing a claim for roof damage from wind and hail, experienced contractors advise homeowners to document all visible impacts, review repair estimates, and promptly notify insurers, ensuring that every detail supports damage claims assessments and routine maintenance checks for materials like bitumen. Follow these steps: Step Action Details 1 Document Damage Take detailed photos of affected areas and note signs of wear in bitumen. 2 Notify Insurer Submit all evidence along with repair estimates to support damage claims. 3 Schedule Inspection Request a professional review to ensure all maintenance concerns are addressed. Tips for a Smooth Insurance Claim Process Property owners who require fair payments benefit from keeping detailed records and prompt inspections of their roofs, including assessments for water damage and advice from a reputable roofer. An expert review on whether repairs or a roof replacement is necessary makes the claim process smoother and supports receiving accurate compensation for the work needed. Impact of Hail Claims on Insurance Premiums Roof damage claims can alter homeowners insurance premiums, with insurance companies adjusting rates based on repair costs and claim history. This section explains how claims affect premiums and discusses strategies for balancing repair expenses with premium changes, including insights from a lawyer and examples from Colorado for a reliable insurance company review. How Claims Affect Your Premiums Northern Generations Construction notes that claims for hail damage repairs affect future premiums, with insurers relying on detailed pdf reports that document impacts as small as a golf ball dent or damage to wood elements, which in turn influences the final cash payouts. This practical assessment helps homeowners understand how each claim may lead to higher costs down the line, ensuring they are better prepared for adjustments in their insurance policies.
How Much Hail Damage Do You Need to Replace Your Roof?
Have you ever asked yourself how much hail damage is needed before replacing a roof becomes necessary? This post explains how to recognize hail damage on your roof and assess whether you need repair or replacement. It also covers details about understanding insurance coverage for hail damage. Homeowners will gain practical tips to evaluate their roof’s condition and make informed decisions that protect their investment. Key Takeaways For Hail damage roof replacement cost Northern Generations Construction stresses that severe hail damage may trigger the need for a full roof replacement. The team assesses issues similar to those seen in Kansas and Minnesota, ensuring customers receive expert advice from trusted roofing companies. The impact of hail often extends to concrete elements on the property, increasing repair costs. Skilled technicians identify damage that affects both structural components and surface finish, ensuring repairs do not simply cover up issues that peek through the paint. The firm reviews each case individually, using a method that roofing companies in Minnesota and Wisconsin also adopt. The approach focuses on long-term stability and clear inspection standards, which helps determine whether repair or replacement is the better option. Identifying Hail Damage on Your Roof Hail damage can appear as small, golf ball-sized dents or cracks on the roof, which may pose problems when discussed with an insurance company. Homeowners should consider reading into their insurance coverage and hail damage coverage to digest the needs for repair and potential replacement options. What Does Hail Damage Look Like on a Roof? The expert at Northern Generations Construction notes that hail damage on an asphalt shingle roof often appears as small dents or cracks, which may signal underlying issues that impact a property’s mortgage, setting the stage for an insurance roof replacement review to address a potential total loss when damage is extensive: Assessing the Need for Roof Repair or Replacement This section explains when repair is adequate and when replacement is necessary. It outlines key aspects such as inspecting downspouts, verifying cash value, and confirming that homeowners insurance covers the work. How Much Hail Damage to Replace Roof? Determining if a replacement is needed versus roof repair involves a detailed review of hail damage severity, structural compromise, and visible surface issues. Experts from a professional roofing contractor assess key indicators, including deterioration around the hood. Understanding Insurance Coverage for Hail Damage Will Insurance Pay for Roof Replacement Due to Hail Damage? Insurance companies typically will consider hail damage claims similarly to roof replacement issues regarding hail damage. Reputable insurance services and building construction specialist organizations do diligently consider structural risks and possible future complications arising from severe weather events, such as tornadoes. According to knowledgeable observers, some insurance features warranty-like elements and rules of thumb outlining how to ensure that clients have an adequate support channel, as noted in trusted outlets, including Forbes, dependably addressing the documented severity of their roofing issues. How much hail damage is needed for a roof to be replaced? A roof is usually considered irreparable if an inch and larger hail are internally bruising, cracking, or significantly losing granules: Local repairs may be considered in some cases. However, in cases where large areas have been impacted, especially bigger-roofed houses, total replacement is often the most practical long-term solution. The assessment of hail damage involves performing a full inspection to understand the extent of hail damage and inform homeowners of the maximum amount toward their decisions. Evidence of dents on gutters, downspouts, siding damage, and compromised shingles will be the visible signs of distress for a roof. There are roofs, however, that may not put up much of a fight against this form of continued destruction and typically some hail may have taken a toll upon these roofs. To replace such roof issues is better known through the years of roof service bane due to the wretched storm. This is important for a homeowner in extensive hail damage, suffering which might lead to a leakage or heightened deterioration, calling for an early replacement. This is a way to prevent costly repairs all too soon after when necessary. This makes engaging knowledgeable personnel post-hailstorm to provide clarity about the restoration options,greatly the requisite decision to be taken How do I file an insurance claim for hail damage on my roof? To initiate an insurance claim related to roof damage caused by hail or storm damage: What to Do Before Filing an Insurance Claim? Before submitting an insurance claim after facing natural disasters like hail storms, homeowners first should review any relevant documents and inspect their roofs carefully looking for signs of water infiltration; following guidelines suggested by entities like the Insurance Information Institute ensures precise record-keeping before initiating claims proceedings: If you find this to be a lenght process and are in the Wisconsin Area feel free to contact us or visit our home page. Step Action 1 Document visible damage and note any water infiltration 2 Review the insurance information and guidelines provided by the Insurance Information Institute 3 Consult a trusted roofing contractor for detailed damage assessment The Process of Filing an Insurance Claim for Hail Damage To file an insurance claim for hail damage, the insurance company will send an inspector to assess the density of the impact areas and the potential for water intrusion, because it got into the roof; hence, another crucial aspect of examination is that it needs to document the type and state of the roof. This information will help present the legitimacy of the need for services such as paintless dent repair, showcasing in-depth knowledge about possible remedies. Northern Generations Construction has the capability of collecting evidence to back them up in explaining their customers about their insurance cover and directing them to take the correct decision for their roofing. Frequently Asked Questions What qualifies as hail damage on a roof? Hail damage can appear on the roof as lumps, dimples, or lost shingle pieces due to hail impact. Northern Generations Construction inspects both residential and commercial roofs
Average Cost of New Windows for Your Home in 2025
Are you trying to determine the average cost of new windows for your home in 2025? This post breaks down key details such as the cost range per window and important factors that shape overall expenses. Homeowners will gain clear insights to guide budgeting and planning for window replacement projects. Key Takeaways Average Cost: $614-$1,309 per window This section explains how costs are distributed in a replacement window project. It outlines the average price for new windows while addressing factors such as water damage repairs and financing via a home equity loan. The content also offers insights relevant to San Antonio homeowners, window replacement in milwaukee, detailing the breakdown of expenses for quality window installations. How Does This Cost Break Down? The cost of new window installations factors in labor, materials, and necessary safety measures such as asbestos checks, while an accurate number of glass units ensures an optimal return on investment. Insurance expenses and meticulous installation practices contribute to maintaining quality and reducing future repair risks. Average Cost of a Window Replacement The cost for a home window replacement covers both the labor and quality materials needed to install new windows in a renovation project. Homeowners appreciate that upgrading windows can boost energy performance and improve the overall look of the kitchen and other living areas. Contractors include fees that account for debris removal and careful handling during the installation process. Homeowners planning a window replacement find that clear pricing helps them manage the expenses associated with a renovation project. The average expense reflects current market rates and the value of skilled work in a home window replacement. Many homeowners choose quality installations for their kitchen and exterior projects, ensuring lasting performance and efficient upkeep. Key Factors That Influence the Average Cost of New Windows Economy options for window replacement provide cost-effective solutions, while low expense and premium expense methods offer varying features. Each style impacts window installation cost and overall typical cost of new windows. Replacement window installation choices may affect aspects like a bow window and the floor layout, ensuring homeowners find the right balance for their projects. Economy Options Window Replacement The economy options window replacement approach offers homeowners a cost-effective solution that maximizes utility and keeps the average house window replacement cost manageable while ensuring compatibility with the roof structure and window screen design elements; this strategy streamlines the expense by carefully balancing quality and affordability: Factor Description Impact Utility Ensures functionality and structural support Improves long-term value Average House Window Replacement Cost Establishes a clear pricing framework Helps in efficient budgeting Roof Provides essential alignment and protection Enhances integration with overall design Window Screen Adds finishing and protective details Contributes to improved aesthetics and performance Expense Drives material and labor selection Determines project affordability Low Expense Window Replacement Low expense window replacement offers homeowners a valuable solution for updating their residences while keeping budgets in line and enhancing energy performance by reducing heat transfer. Contractors use clear pricing strategies when replacing older windows, which include options such as Pella replacement windows prices for competitive value, along with features like skylight and awning systems that improve functionality and aesthetics: Premium Expense Window Replacement Premium expense window replacement offers a refined solution for home improvement projects by utilizing Energy Star rated materials that deliver superior performance and durability. Experts assert that upgrading to these high-quality windows improves space efficiency and complements drywall installations while providing an average cost that reflects both market standards and long-term value. This approach ensures that homeowners achieve a premium finish with reliable energy performance and lasting appeal. Expense Analysis by Window Type This section compares the cost for each window type such as Single-Hung and Double-Hung, while also analyzing Casement, Sliding, bay window, and specialty options. It addresses factors like foam and lamination in installation and offers practical insights from a trusted handyman perspective, freeing homeowners to plan budgets with clarity. Single-Hung Windows Cost Single-hung windows carry a fee that encompasses precise installation and quality materials, including genuine wood frames and krypton gas for enhanced performance against wind challenges. Northern Generations experts suggest that this option delivers reliable value and durability for homeowners seeking effective and efficient window solutions. Cost Range: On average, single-hung window prices start at $150 reaching up to $400. This price accounts for the window unit and basic installation; however, the price may vary according to the frame material and other specific features, such as energy-efficient glass or special coatings. Double-Hung Windows Cost Double-hung windows offer a balanced blend of style and efficiency by enhancing the aesthetics of any home while minimizing issues like condensation. Northern Generations Construction provides clear window replacement cost information, enabling homeowners to consider options such as a loan for financing quality upgrades that deliver both reliability and value. Casement Windows Cost Casement windows cost reflects the approximate cost to replace windows by incorporating features such as laminated glass and stringent lead-safe practices, balancing quality and the average home window replacement cost for a durable and secure upgrade: Cost Range: Casement windows generally range from $300 to $800 per window. This cost accounts for their high energy efficiency and the complexity of the hardware required to operate the sash. Sliding Windows Cost Sliding window costs include careful installation and durable materials that offer homeowners a reliable option while considering overall project money allocation, whether it is for matching a window shutter style or updating existing plumbing routes. Professionals in the industry highlight that a clear price structure ensures homeowners can balance their renovation expenses and secure a quality upgrade that lasts. Cost Range: Sliding windows are typically within the range of $250 to $750 per window. Costs vary based on the size of the window and the materials used, as larger or custom-sized sliders can increase the price. Bay and Bow Windows Cost Bay and bow windows offer homeowners a refined opportunity to replace older systems with designs that optimize noise reduction and improve room comfort, while local experts emphasize that installation
How to Measure for Retrofit Windows: Essential Guidelines for Accurate Sizing
Table Of Contents: Do you struggle with accurate retrofit window measurements? This guide explains the basics, offers a detailed step-by-step process, and points out frequent mistakes to avoid. Homeowners will find clear instructions that simplify the task of measuring retrofit windows correctly. Readers gain practical tips to prevent costly errors and ensure proper sizing for their property. Key Takeaways Understanding the Basics of Retrofit Window Measurements This section explains retrofit windows, outlining their purpose and key measurement terms. It provides insights on using accurate measurements to determine sizes, featuring elements such as floor levels, aluminium frames, bow window specifics, fiberglass qualities, and argon insulation details. This guidance sets the stage for practical steps in window measurement for retrofit projects. Defining Retrofit Windows and Their Purpose Retrofit windows offer a practical method to update existing structures by reusing original framing while ensuring efficient window installation. Professionals rely on these windows during a window replacement project to install replacement windows without extensive modifications to the wall. This approach maintains the integrity of existing framing and provides a streamlined process for improving home exteriors. Retrofit windows are designed to work with current wall structures, making the window replacement process less disruptive. Their design ensures that when professionals install replacement windows, the original framing supports accurate measurements and secure installation. This method delivers consistent results in window installation, meeting the needs of homeowners seeking reliable updates. Key Terminology in Window Measurement Understanding key terminology is vital when measuring retrofit windows. Professionals address dimensions such as window sill height and construction window width while considering elements like brick layout, metal framing, and specific setups for areas like the bathroom: Term Description Window Sill The lower edge of the window frame that supports the installation. Construction Window Pre-sized opening tailored for retrofit installation. Metal Sturdy component used in framing for lasting support. Brick Masonry element that can affect overall measurement accuracy. Bathroom A setting where precise window fit is necessary for optimal functionality. Accurate measurement prevents errors in retrofit project execution. Skilled technicians use these definitions to verify precise alignment with construction window standards, ensuring that metal details, brick placement, and window sill dimensions meet the specific requirements of spaces like the bathroom. Preparing for Accurate Measurements Gather all required tools near awning and window screen. Assess existing window frames for vinyl replacement windows while considering indoor air quality. Prepare the area for installing replacement windows. This section outlines tool gathering, frame evaluation, and installation area setup to ensure accurate retrofit measurements. Gathering Necessary Tools for Measurement Professionals begin by gathering high-quality tools essential for any accurate measurement task, especially when they plan to install retrofit windows in areas featuring both wood and metal. Collecting items such as a tape measure, a level, and a reliable caulk gun is critical in this window world, and a well-prepared toolkit minimizes later setbacks during installation: Experts understand that a complete set of tools ensures each window measurement is precise and supports swift execution during projects. Accurate tools provide clarity and efficiency, allowing professionals to install retrofit windows while aligning with the specific demands of wood structures and caulk application processes. Assessing Current Window Frames and Surroundings Skilled professionals begin by inspecting the current window frames, carefully examining glass elements, jamb integrity, and adjacent vinyl siding to ensure a solid support system for retrofit renovation. They evaluate all components, including a casement window, to pinpoint any wear that might affect the measurement process and secure installation. Experienced teams review the surrounding structure with attention to detail, noting the condition of vinyl siding and frame alignments. They use their detailed assessment to address minor discrepancies, ensuring every glass unit and casement window feature supports a precise retrofit project. If you are looking for a skilled professional in Wisconsin, Northern Generation, a trustworthy name for widow replacement that you can consider. Preparing the Installation Area Professionals begin by clearing the installation area to remove any obstructions that may affect retrofit window installation. They confirm that the space supports accurate measurements around construction windows and prepares the surroundings for smooth retrofitting. Experts ensure a safe workspace by checking that adequate ventilation is available during setup. They use a reliable tool to verify dimensions and confirm that the environment meets the standards needed for a secure retrofit window installation. Step-by-Step Guide to Measuring Retrofit Windows Professionals start with precise width and height measurements to maximize aesthetics, thermal insulation, and insulated glazing performance while reducing noise. They then assess frame depth, evaluate sill and head conditions, and verify squareness and level to ensure effective home improvement. These steps offer practical insights for a robust retrofit window installation. Measuring Width and Height With Precision Measuring the window’s width and height accurately is vital for retrofit projects to ensure the installation fits the available space and supports soundproofing features. Skilled teams use reliable tools to verify every inch of measurement, helping to keep the project within budget while meeting strict construction standards. Experts take care to record dimensions carefully so that each retrofit window aligns perfectly with the existing structure. This approach minimizes surprises during installation, maintains effective soundproofing, and complies with construction requirements on a manageable budget. Accounting for Frame Depth Accurate frame depth measurement is vital to retrofit window projects because it ensures that every window fits within the existing structure while maintaining high energy and efficiency standards. Professionals meticulously check the frame’s height and other dimensions to create a balanced installation that upholds building integrity. A free estimate provided during consultations can confirm that all required measurements are met. Skilled teams verify each frame’s depth to support optimal energy distribution and overall efficiency in window performance. They compare measurements and adjust installation details to match the predefined height and width, ensuring a secure retrofit process. Homeowners benefit from a free estimate that clarifies how proper measurement of frame depth contributes to a long-lasting installation. Evaluating the Sill and Head Conditions Experts assess the sill and head conditions by using a tape measure
How to Replace a Window From the Inside: A Simple Guide
Have you ever struggled with replacing a window from the inside? This guide offers clear steps to prepare for the window replacement process, remove the existing window safely, and install the new one correctly. Homeowners will learn accurate measurement techniques and how to troubleshoot common issues. Northern Generations, a trusted name in exterior services in Milwaukee County and beyond, brings over 10 years of experience to help solve your window replacement challenges. Prepare for the Window Replacement Process Preparation begins with setting up a secure workspace and gathering all necessary supplies listed on a clear menu. This step ensures that every tool is ready for the replacement process. Before work begins, it is advisable to apply a fresh layer of paint to protect the window frame if needed. Such preparation minimizes delays and supports a smooth replacement project. A detailed plan serves as a practical shortcut to reduce errors. The technician follows the cursor on the instructional guide to maintain a steady pace during the replacement work. Safely Remove the Existing Window This section outlines a directory of necessary tools, including a latch, and explains how to remove window trim and caulk, the basic steps for safely taking out the old window. It also covers how to install replacement windows from the inside and uses text editor simplicity to guide homeowners through the removal process. Tools Needed for Window Removal The technician employs a utility knife to score caulk and clean up old sealant for a smooth removal process. The process uses the tab key and caret markers on the window trim as guides, applying proven theorem techniques with a silver edge to ensure precise and safe extraction. Removing Window Trim and Caulk The technician uses a utility knife to score the caulk and a pry tool to remove the trim without causing damage to the window frame, ensuring a clear and orderly workspace while considering details such as how much it costs to install an interior door for budgeting reference: Step Action Tool 1 Score the caulk lightly along the trim edge Utility Knife 2 Ease off the trim carefully using a pry tool Pry Tool 3 Clear away loose sealant and debris Scraper Carefully Taking Out the Old Window The technician follows detailed procedures to safely extract the old window for an inside replacement, ensuring every phase minimizes damage while keeping the opening secure; careful scoring of the caulk and steady use of tools allow a controlled removal process that leaves the frame intact and ready for the next step: Step Action Tool 1 Score the caulk along the trim edge Utility Knife 2 Gently pry to remove the window Pry Tool 3 Clear away the old sealant and debris Scraper Accurate Measurements for New Window Installation Accurate measurements are essential for a perfect replacement project. This section reviews how to measure window frame dimensions, assess the opening for proper fit, and verify the frame’s squareness. Each topic provides practical insights to ensure that the new window aligns correctly with the existing structure. Measuring the Window Frame Dimensions The technician measures the horizontal and vertical spans of the window frame with precision, ensuring a snug fit for the new unit. Accurate inspections prevent misalignment issues that could compromise the installation and burden homeowners with additional adjustments. Practical experience confirms that verifying dimensions twice streamlines the replacement process and improves overall project outcomes. Assessing the Opening for Proper Fit The technician confirms that the window opening fits the new unit by carefully checking every dimension and verifying that the frame is squared, which supports a smooth installation process. This measured approach minimizes future issues and ensures a secure, energy-efficient outcome for homeowners: Checking for Squareness in the Frame Precision in measuring the squared nature of the window frame is key for smooth installation and proper fit, which saves time and reduces future adjustments. Technicians from Northern Generations perform careful diagonal measurements to confirm balance and identify any required modifications: Step Action Tool/Measurement 1 Measure diagonally from one corner to the opposite corner Tape measure 2 Repeat the measurement on the other diagonal Tape measure 3 Compare both values to ensure the frame is square, adjusting as needed Level and adjustment tools Select the Right Replacement Window This section covers different types of replacement windows, energy efficiency ratings to consider, and material choices for window frames. It provides homeowners with practical advice on selecting a window that fits the project needs and budget. The following topics deliver clear, concise guidance to support a smooth window replacement process from the inside. Different Types of Replacement Windows The technician reviews various options such as vinyl, fiberglass, and aluminum windows, each offering unique benefits in energy efficiency, maintenance, and durability. This careful comparison provides clear guidance for selecting the right replacement window for a precise inside installation: Energy Efficiency Ratings to Consider Technicians at Northern Generations use detailed energy efficiency ratings to determine the best window option, ensuring it meets established insulation and thermal performance standards. The criteria they follow guide homeowners toward selecting units that lower energy costs and contribute to a more balanced indoor environment. This careful evaluation process leads to a window installation that aligns with long-term performance and safety requirements. Material Choices for Window Frames Material choices for window frames significantly affect both energy efficiency and long-term durability, making this decision crucial in the window replacement process. Northern Generations advises homeowners to consider durable options like vinyl, fiberglass, and aluminum for an inside installation, as these materials offer strong performance and ease of upkeep. The professionals from Northern Generations ensure that each material recommendation is supported by over a decade of expertise in exterior services across Wisconsin. Installing the Replacement Window From Inside This section details preparing the frame for installation, setting the window in place, and ensuring proper sealing and insulation. The guide offers clear instructions and practical insights to help homeowners complete an effective window replacement project while meeting professional standards. Preparing the Frame for Installation
How to Measure Casement Windows for Replacement

Are you tired of inaccurate measurements leading to poorly installed casement windows? This guide explains how to measure casement windows for replacement accurately, covering the tools needed and clear steps for checking width, height, and depth. The reader will learn to avoid common mistakes, ensuring a perfect fit for each replacement. The information helps solve issues that arise with window installation and prepares the way for a successful window upgrade. Key Takeaways Understanding Casement Windows and Their Importance in Replacement Casement windows offer reliable performance and easy operation, making them a preferred choice among window types. Their design allows for smooth opening and closing, while quality manufacturing ensures they fit securely into structures built with brick and other durable materials. Precise measurement is key when addressing casement window replacement. Accurate measurement supports proper alignment and effective sealing, which proves essential, especially when comparing them to bay windows and other window types. Reliable replacement relies on understanding casement windows and their functionality within a property. Quality manufacturing and careful measurement help maintain a home’s structural integrity while ensuring that materials, such as brick, complement the window design effectively. Tools Required for Measuring Casement Windows Accurately A quality tape measure and a square gauge are vital tools for determining the exact length of the casement opening. Expert measurements ensure that the window will fit securely within the trim, laying the groundwork for a successful replacement. Skilled technicians use a marker and a level to quickly verify the proper placement of the trim. Their careful work lessens the risk of condensation by ensuring a tight seal and correct fit during installation. Project guides available in html format offer clear examples that boost confidence in the measurement process. Reliable instructions and hands-on tools work together to confirm that the new window meets the required length and fits perfectly within the designated space. Step-by-Step Guide to Measuring the Width of Casement Windows Measuring casement windows accurately means starting from the inside frame for an optimal fit. This section clearly describes techniques to replace windows, install replacement windows on the floor, and work alongside bay window designs. Following these steps can help protect the warranty and ensure a secure, lasting installation. Measuring From the Inside Frame for Optimal Fit Skilled technicians begin with the inside frame to capture accurate dimensions for casement windows, ensuring the measured space is ideal for precise glazing installation. They apply proven techniques from construction expertise and take into account design influences, such as bow window features, to secure a perfect window replacement. Ensuring Accurate Measurements With Proper Techniques Experienced technicians use a quality tape measure to secure accurate dimensions that help keep installation costs within budget while optimizing energy performance during each window replacement. Their proven methods ensure that the new window aligns perfectly with the building’s structure, offering a straightforward solution to common installation challenges. Step-by-Step Guide to Measuring the Height of Casement Windows This guide explains how to identify the best height points for measurement while avoiding common errors. It covers techniques that improve aesthetics, help when casement windows open, and even consider awning options. These insights answer the question many professionals have and enable accurate, reliable installation practices. Identifying the Best Points for Height Measurement Technicians mark the precise point where the window sill meets the wall and use quality lumber as a reference to ensure that measurements for replacement casement windows are exact. They consult detailed guides, often prompting them to skip to content areas that provide clear instructions, resulting in a secure installation and a flawless fit. Avoiding Common Measurement Mistakes Technicians consistently check information and verify that each screw is correctly placed to measure window size with precision while keeping the design streamlined and secure. Their proactive approach minimizes errors that might allow water intrusion, ensuring a flawless installation that stands up to everyday wear. Measuring Window Depth for Comprehensive Replacement Examining frame depth differences and using proper tools boosts installation efficiency. The process verifies each hinge, checks the exact insert fit, and reviews the hung windows data logged in a notebook. This section provides clear steps and practical insights to ensure reliable depth measurements for a flawless window replacement. Understanding Frame Depth Variations Understanding frame depth variations is vital for a precise casement window replacement because a slight miscalculation in the window frame may affect performance, similar to challenges faced in door replacement projects: Tools to Ensure Accurate Depth Measurements Skilled technicians employ precision tools such as depth gauges and calibrated tape measures to capture the exact shape of the window frame, ensuring every single casement window fits securely. They use these tools as a reliable reference in home improvement projects, streamlining the process and delivering a perfect replacement every time. Additional Considerations for Unique Casement Window Configurations This section covers how to measure casement windows for replacement with custom shapes and multiple units. It explains how proper framing, precise mullion placement, and careful checks help avoid water damage in replacement windows. The content offers practical insights for installing replacement windows that meet unique configuration needs. Measuring for Custom Shapes and Sizes Skilled technicians use exact methods to measure custom window shapes, ensuring every casement fits perfectly into the window opening. Drawing on techniques seen with brands such as Pella, they provide a reliable estimate that considers optimal airflow and necessary plumbing clearance, delivering practical benefits for durable installations. Factors to Consider With Multi-Unit Casement Windows In multi-unit installations, professionals take great care to verify window sizes and the precise angle for each section, especially when determining how to measure a casement window for replacement in spaces like a bedroom; their process ensures different window styles align perfectly with the structure’s overall design: This method minimizes errors during installation and helps secure a flawless replacement every time. Finalizing Your Measurements and Preparing for Replacement Double-checking every measure is key before starting a casement window replacement. Confirm the height, precise dimensions, and window screen details to meet building code rules. Document how to measure
Elementor #6149
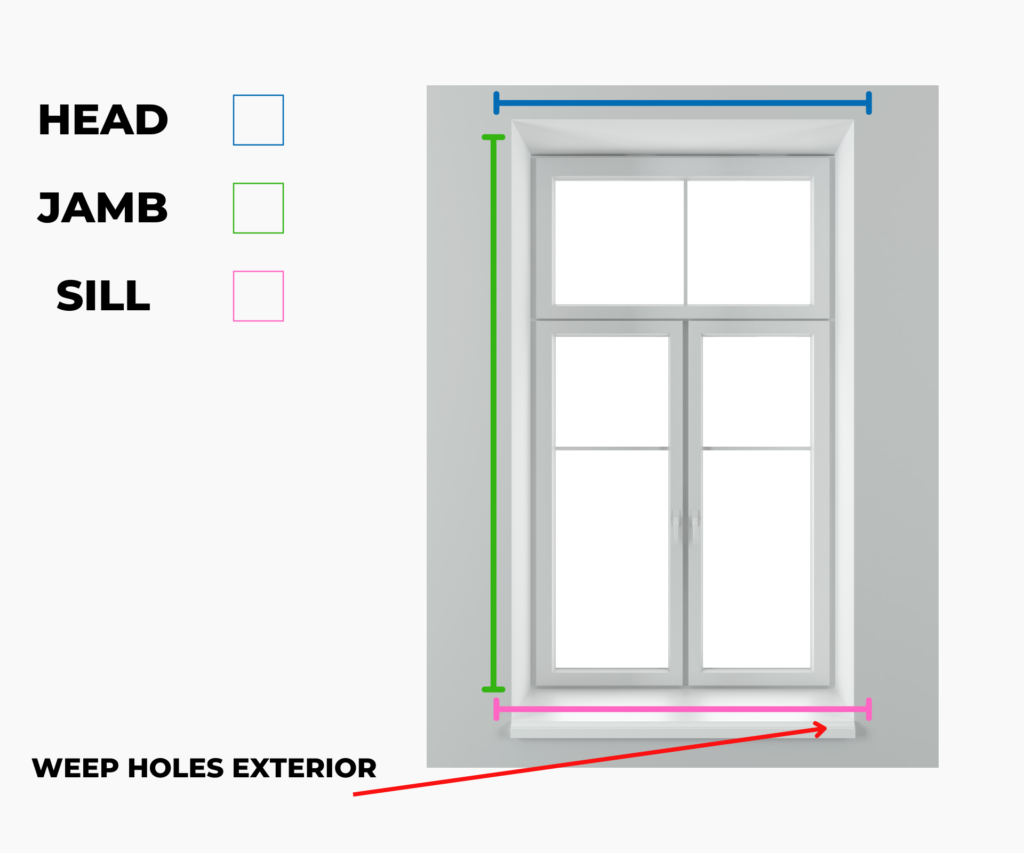
How to Measure Replacement Windows The most exact measurement is necessary so that the new windows, particularly if considering replacement basement windows sizes or smallest double hung window, fit precisely. This quick guide summarizes all the crucial measuring steps for the correct installation of windows, thus saving you time and needless expenditure. Metal tape measure Notepad and pencil Level (optional but recommended for accuracy) What Are the Parts of a Window Frame? Head The head is the uppermost board of the window frame; it’s crucial to measure from edge to edge at the top of the frame. This allows you to estimate the proper width of the window, vital when considering Andersen window sizes and prices or 36 x 36 sliding window replacement.Jambs The jambs are the sides of a window frame.; Importance: Measure each jamb to assess window height. Include both the left and right jambs for a correct overview of the heigh Sill The sill is the lowermost board of a window frame that generally supports the weight of the window.: Checklist for Measurement: Do the height measurements from the top of the sill of the window to the head and make sure the sill is level. Apron This is a decorative piece located just beneath the sill from inside the apartment.; Role: This is usually not part of the structural measurement but important for aesthetic value in relation to the overall window installation. Weep Holes These are small openings made in the outer sill of the window to let water flow out.; Importance: This is important to know so that, after installation, the weep holes are not blocked; otherwise, this can cause water damage and shorten the service life of your window. How to measure a Window for Replacement Precise measurements are critical to ensure that the new windows fit perfectly into the existing openings. Measuring Window Width Step by Step: From jamb to jamb, measure the width of the top, middle, and bottom of the window opening. Always take the smallest of the measured width to ensure a proper fit. especially critical when dealing with custom sizes like 36 x 48 window replacement or 24 x 48 window replacement. Measuring Window Height Measure from the bottom of the sill to the head of the left, center, and right side of the window and take the smallest height for a snug fit. Special Considerations Measuring for Storm Windows Special Considerations: Include the entire window opening and check for any additional space needed for installation hardware. Measuring for Window Screens Consider the full window opening and check for extra space to be allocated for installation hardware.how to measure for replacement vinyl windows? Measuring casement windows For casement windows, measure the width and height from the inside edges of the window frame. Ensure the window is fully closed to accurately capture the dimensions needed for a perfect fit replacement. Key Differences When Measuring for Vinyl Windows When measuring for replacement vinyl windows, it is important to allow for their thermal expansion and contraction due to temperature changes. Therefore, provide about a 1/4″ clearance on all sides to allow for this expansion. Before you do anything with measuring, it would be wise to check your manufacturer’s installation guidelines for specific requirements, like clearances and add-ons Expert Tips for Measuring Windows Measure either the existing screen or the area it will be going into. The case is different if it covers an area where no screen exists; measurement in this case will be according to the area the screen will fit into, with allowance for the frame Double-Check Everything Always check your measurements-at least twice. This reduces mistakes and the likelihood of ordering windows that are a size too small or large. Take Your Time Don’t rush the measurement process. Do not be in haste in taking sizes. Take time, this will save you from a lot of hassles and pay off some extra cash. Don’t Cut Corners Guidance: Be thorough in measuring all parts of the window, including the depth, to ensure that the new windows can be installed properly without modifications. Measure for Depth Importance: Measuring the depth from the highest point of the window sill to the innermost part of the window opening is crucial for flush installation. Always check your measurements-at least twice. This reduces mistakes and the likelihood of ordering windows that are a size too small or large. FAQ: Measuring for Replacement Windows Do I Need to Remove Trim to Measure for Replacement Windows? No, trim need not be removed for replacement window measurements. Measure inside the existing frame between the jambs (sides of the window) without affecting the trim. Do Window Sizes Include the Frame? No. Standard window sizes typically refer only to the glass along with the very immediate holding structure surrounding it; the measurement excludes the outermost frame. In the case of ordering replacement windows, take care in focusing on the dimensions of the glass and core frame fitting into the existing opening. Where to Get Odd Size Replacement Windows? Odd-sized replacement windows can generally be ordered through specialized window companies providing custom window solutions. Provide exact measurements to them, and they can then make a window fitted to your specifications. Other related window blogs
Replacing Old Windows

2025 Guide to Replacing Windows in Older Homes In this article, we will be going over the average cost of new windows in 2025 so you can make informed decision. We will go through the costs related to window replacement, analyzing average costs by type, and tips on saving expenditures during the process. We will discuss the advantages of energy-efficient windows and how they impact the market value of a home. By the end, you shall have a clearer understanding of window replacement costs and be better placed to select your project company. Choosing the Right Replacement Windows for Your Old House Signs It’s Time to Replace Your Old Windows Many homeowners don’t really realize that it is time for the replacement of their windows until it is late. Visible drafts chilling home conditions, increased energy bills because of failing windows, visible decay-seen as rotting frames or broken panes-show such signs that this may be urgent. Such signs are not only annoying; they point to huge losses of energy and structural problems likely to cause even bigger problems as time goes on. How to Choose Windows That Maintain Your Home’s Historic Charm When updating windows in a historic home, be narrowed by both function and aesthetics. Replacement windows that mimic original styles can maintain or even add to the historical charm of your home given. Find window styles and materials resembling the originals with wood frames and single-pane glass, and check with custom manufacturers who specialize in historical reproductions. Many local Milwaukee artisans are capable of providing insights and solutions that big box stores cannot. Benefits of Replacing Windows in Historic Homes Boost Energy Efficiency with New Wood Windows Modern technologies can render the energy efficiency of your home a big time up without ruining its historic character. Features of new wood windows include the inert gas fill method and the use of low-E coatings. Designed to look just like a traditional window, they do far better in terms of thermal performance. In short, heating bills would be lower in a city like Milwaukee during the cold Winter months and one would keep much cooler in the hot summer turns Design Options for Replacement Windows in Historic Properties In Historic Properties A good design is crucial in restoring the authenticity of your historic Milwaukee home and making it more valuable and appealing. When you’re choosing replacement windows, consider options that feature period-appropriate mullions frame designs, and even historically accurate hardware. Manufacturers who offer customization can help you match nearly any historical detail, like ensuring the new windows look as if they’ve always been a part of your home. Window Replacement Options for Old Houses Selecting the Best Material for Longevity and Aesthetics In Milwaukee’s variable climate, your windows’ material can impact their longevity and aesthetic appeal. Wood windows are the most historically correct for historic homes; it is the most genuine looking and can be painted or stained to match existing woodwork. There is, however, some maintenance to prevent decay on wood. Vinyl and fiberglass can last long and need little maintenance but matching them to the historic aesthetic is a bit difficult. Each material has its pros and cons, based entirely on your own needs and the local climate considerations. Why Wood Windows Are a Top Choice for Historic Homes Wood has always been the desired material for windows because of its natural beauty and versatility. It can easily follow the design of any opening, and it could easily have a finish that would be completed in accordance with the exact mode of a given historical period. Also, being naturally insulative, it’s very effective in keeping an old house temperate-that may, through time, certainly build up to be quite drafty construction. Practical Tips for Window Replacement in Historic Homes How to Replace Windows in an Old House Sunroom Replacement of windows in sunrooms takes on special consideration, as it is even more so the case in old homes of Milwaukee City. Match the style and ensure resistance to elements. Select windows that will minimize UV rays to extend the life of furniture and floor coverings. Also, look for frames that will withstand humidity and the vagaries of temperature; you’ll not regret the long-term investment. How to Replace a Window in an Old House To replace a window in an old Milwaukee house, proceed with caution and carefully remove the window. Make precise measurements of the aperture, select a window that has an almost perfect or exact fit. Use shims to ensure a level and plumb installation. Caulk and insulate around the frame for energy efficiency. The original look is important, so when you choose a window, pick accordingly to the home’s historic character. How to Preserve the Design Integrity of Your Historic Home To preserve the design integrity of a historic home means attention to detail. Rely on imitation of original windows. Depending on the nature of your home’s period, this may mean ordering custom windows that resemble its original features. Consult local historians or architects who work with historic properties to make sure you do not make choices that diminish the heritage of the home. Steps to Replace Windows Without Compromising on Style Your window replacement project should not interfere with your home’s historic style, so bring in experienced professionals who will understand the nuances of historic window design. Use materials that closely imitate the old but allow since they involve modern window technology. Such small points as finish and hardware may make a great difference in wardrobe life consistency in your environment. Practical Tips for Window Replacement in Historic Homes How to Replace Windows in an Old House Sunroom Replacement of windows in sunrooms takes on special consideration, as it is even more so the case in old homes of Milwaukee City. Match the style and ensure resistance to elements. Select windows that will minimize UV rays to extend the life of furniture and floor coverings.
diy window replacement
DIY Window Replacement: Pro Tips for Affordable Installation key Takeaways Introduction to Replacement Windows: Information on how many kinds of windows there are and which windows would work best in your home. Tools and Materials: These are what you will expect to need to carry out your window replacement. From Step 1 to Last: Instruction step by step on how a window is removed and replaced. Professional Help: Determining when it is better to call a professional than do it yourself. Budgeting for Window Replacement: Some thoughts on how to budget for your window replacement. Local Considerations: Make sure that local building codes and ordinances are satisfied for your project. DIY Window Installation & Replacement One of the best ways to change up the aesthetics of your home is to replace windows by yourself. With this guide, you should know what you need for the process of window replacements in your home then get started in reinventing and upgrading your personal space without burning a hole in your pocket. Why DIY? Cost-Cutting: Save on labor costs that would occur if a professional were hired for the installation by doing the work yourself.Customization: Incorporate into your home interior and select windows that cater to the design of the house and your own satisfaction.Satisfaction: Achieve the sense of accomplishment and satisfaction that comes upon the completion of home improvements by yourself Choosing the Best Windows for Window Replacement Choosing the correct windows will make or break your window replacement job. These are issues you should consider to make a sound decision. Double-hung windows are functional, easy to clean, and good for almost any type of room. Casement windows offer ample airflow and an unobstructed view, good for kitchens and bathrooms Picture windows operate as ‘giant views,’ allowing maximum natural light into rooms for which ventilation is not crucial, such as living rooms. Vinyl windows: strong, somewhat less maintained, and quite efficient. Design Compatibility Ensure the window style complements the architectural design of your home to boost curb appeal Tools and Materials Needed for DIY Installation Tools Required: Utility Knife Power Drill Screwdriver Set Putty Knife Spirit Level Measuring Tape Materials Needed: Correctly sized Replacement Windows Silicone or Latex Caulk Expanding Foam Insulation Window Flashing Appropriate Screws Shims Step-by-Step Guide to Replacing Your Windows Preparing Your Old Windows for Removal Remove that old window by scoring around the frame with a knife. Take care to pry out the window frame gently. In practical terms, take extreme care with the glass and dispose of every fragment. How to Install New Windows Yourself To properly fit your new window, make sure the frame does not protrude through the rough opening, does not bend during installation, or push out of shape. Use screws to secure in place and seal with caulk. Check for drafts before finishing. When to Consider Professional Help If a large project is in-store, or in cases in which structural changes may be needed, we suggest the hiring of a professional window installation service. other related blogs Frequently Asked Questions Can I replace windows myself? Window replacement costs are influenced by several factors, including the size and number of windows, frame material (vinyl, wood, or aluminum), glass type (single, double, or triple-pane), energy efficiency features, installation complexity, and labor rates in your area. Brand and customization options also affect pricing. Can you buy Andersen windows and install yourself Energy-efficient windows reduce heating and cooling costs, improve comfort by minimizing drafts and temperature fluctuations, block harmful UV rays, and enhance home value. They also contribute to environmental sustainability by lowering energy consumption and reducing carbon footprints. Where to buy replacement windows DIY Yes, you can save money when replacing windows by comparing quotes from multiple contractors, choosing energy-efficient options for long-term savings, considering vinyl frames instead of wood, opting for standard sizes rather than custom, and timing your purchase during off-peak seasons or sales periods. Is it cheaper to replace your own windows? Yes, you can save money when replacing windows by comparing quotes from multiple contractors, choosing energy-efficient options for long-term savings, considering vinyl frames instead of wood, opting for standard sizes rather than custom, and timing your purchase during off-peak seasons or sales periods. Window replacement costs are influenced by several factors, including the size and number of windows, frame material (vinyl, wood, or aluminum), glass type (single, double, or triple-pane), energy efficiency features, installation complexity, and labor rates in your area. Brand and customization options also affect pricing. Energy-efficient windows reduce heating and cooling costs, improve comfort by minimizing drafts and temperature fluctuations, block harmful UV rays, and enhance home value. They also contribute to environmental sustainability by lowering energy consumption and reducing carbon footprints. Yes, you can save money when replacing windows by comparing quotes from multiple contractors, choosing energy-efficient options for long-term savings, considering vinyl frames instead of wood, opting for standard sizes rather than custom, and timing your purchase during off-peak seasons or sales periods. Yes, you can save money when replacing windows by comparing quotes from multiple contractors, choosing energy-efficient options for long-term savings, considering vinyl frames instead of wood, opting for standard sizes rather than custom, and timing your purchase during off-peak seasons or sales periods.
Types Of Commercial Roofing Systems

Commercial Roof Types: Exploring Roof Systems and Materials Table of Contents Add a header to begin generating the table of contents Types of Commercial Roofing Systems Common Types of Commercial Roofs Commercial roofing system selection is imperative; besides safeguarding your commercial properties, it also determines the maintenance costs and provides energy efficiency. The following is a rundown on the most common commercial roofing systems Understanding Commercial Roof Configurations An Overview of Commercial Roof Types The configuration of commercial roofs is important in making a selection of which kind of system to use. Roofs can be generally categorized into Low Slope Roofs: : Low-Slope Roofs: Most commonly found in commercial buildings such as warehouses and retail centers, these roofs often utilize EPDM, PVC, and TPO roofing materials to achieve excellent coverage and performance. Steep Slope Roofs: Steep-Slope Roofs: More common to the residential yards but applicable to selected commercial properties, this roofing employs metal. shingles, or tiles, providing a pleasing look. Steep-slope roofs usually consist of three parts: waterproofing, roof decking, and support or the framing structure Types of Single Commercial Roofing Systems The Purpose and Uses of Single Ply Single ply roofing systems have grown increasingly popular in recent decades. They are loved for their incredible flexibility and durability. Materials include TPO, PVC, and EPDM. They are lightweight and fashioned as a single layer, which is an advantage regarding installation-type on some designs or approaches, which takes the labor costs another notch lower. There are two common types of single-ply membranes: Thermoplastic Membranes: These membranes often include TPO and are particularly appreciated due to their weldability by heat and high degree of reflectivity, hence contributing to significant reductions in cooling costs. Thermoset Membranes: Include EPDM, which ranks high in resistance to ultraviolet light and weathering and is aptly used for areas with very harsh environmental conditions. TPO (Thermoplastic Polyolefin) PO (Thermoplastic Polyolefin) TPO has gained a wide reputation for low-slope commercial applications in North America. TPO sheets are reinforced with heat-welded seams that provide leak resistance. TPO is a low-cost roofing membrane that offers a number of installation options: mechanically attached systems, adhered systems, and ballasted roofs PVC (Polyvinyl Chloride) PVC (Polyvinyl Chloride) Underground PVC roofing has many valuable layers with polyester as the main reinforcement. These roofs are hot welded, which provide neatly sealed seams that protect against UV rays and mechanical damage at a cost. It has flexibility, is easy to install, and has a welding property that makes for seamless connections between sheets. Another quality of PVC is that it is long-lasting and fireproof EPDM Roofing EPDM Roofing-The Ethylene Propylene Diene Monomer-is a synthetic rubber known for its very good durability and elasticity, thus making it particularly very effective against the sun and decay through ozone. The low price combined with excellent life expectancy makes it one of the most favored membranes in commercial roofs. Built-Up Roofing Systems Built-Up Roofing Systems (BUR) Built-up roofing has continued to be the mainstay for its durability over many decades. It consists of multiple layers of tar applied over the felt roofing, as is manufactured for roof coverings. Multiple layer built-up systems should be preferred in climates where the temperature is greatly fluctuated. Metal Roofs Metal roofs are admired for their attractiveness, efficiency, and durability. Installing metal roofs is possible on low-slope and steep-slope roofs alike, and they are made from materials like aluminum or copper, and steel. Liquid Applied Roofing Use of liquid applied roofing is most advantageous on intricate or difficult surfaces where traditional sheets may not be feasible Roof Coating Systems Roof coatings systems are installed over an existing roofing system to augment the life of the roof by protecting it against the rigors of weather, UV rays, and mechanical damage. There exists a plethora of coating materials, with silicon and acrylic being the most conventional ones; silicon and acrylic coatings are especially good for metal roofs, providing energy efficiency improvements. Green Roofs Green roofs offer not only aesthetic and environmental benefits but also better insulation and decreased effects of heat through urbanization. These systems are vegetative layers that, in one way or another, assist the management of rainwater and improvement of insulation. Photovoltaic (PV) Solar Panels Integrating photovoltaic panels with the roofing systems effectively convert the roofing into a source of power generation, adding thus long-term saving in the cost of useful work as well as environmental benefits particularly in sunny areas. Steep Slope Roofing Although less common in commercial applications, such systems find usage commonly in buildings where aesthetics are paramount, such as hotels or institutional buildings. The materials for steep slope roofs cover a broad spectrum ranging from shingles and tiles to metals and slates, offering the designers a solid set of choices. Insulation & Cover Boards Adding insulation and cover boards to enhance thermal performance will deliver all-important energy savings to a building. Adding insulation is especially effective when roofs are replaced since these updates ensure compliance with current energy codes while dramatically reducing heating and cooling costs. Previous PostNext Post